Introduction
Months of planning go into a conference — venue negotiations, speaker bookings, sponsor commitments, logistics for hundreds of attendees. Then the event happens, and without intentional photography, those moments disappear. A blurry keynote shot, a missed networking conversation, a sponsor banner that never made it into frame.
Done well, conference photography becomes a durable marketing asset. According to the Content Marketing Institute's 2025 B2B research, 52% of B2B marketers rate in-person events among their most effective distribution channels — and that value only holds if the event is well-documented.
Post-event recaps, next year's promotional materials, sponsor acknowledgments, annual reports: all of it depends on photos that were planned for, not assumed.
This guide covers 8 tips, from building your shot list before the event to capturing candid moments that make future attendees want to register.
Key Takeaways
- Brief your photographer with a run of show, VIP list, and any restricted sessions before they arrive
- Use fast lenses (f/2.8 or wider) and a camera that performs well at high ISO — conference venues are typically low-light environments
- Skip on-camera flash during presentations; available light and high ISO are your best tools
- Vary your angles from wide room shots to tight speaker close-ups; a single scale leaves the full story untold
- Decide how you'll use the images before the event, then build your shot list around those needs
Before the Shoot: How to Prepare for Conference Photography
Missed shots at conferences usually come down to one thing: arriving without a clear brief. Even experienced photographers waste the first hour piecing together basics — who the keynote speaker is, where the sponsor wall is, and which sessions allow cameras.
A solid pre-event brief should cover:
- Run of show — full schedule with start times, session lengths, and breaks
- VIP and speaker list — names, titles, and ideally headshots so they're recognizable on arrival
- Branded elements to feature — sponsor signage, step-and-repeat banners, exhibitor booths
- Restricted zones or sessions — some scientific and professional conferences prohibit photography during formal presentations entirely (the AGU, MRS, and ATCE all enforce this for their events)
- Access credentials — confirm in advance whether a press badge is required and whether there are restrictions on equipment
Tip 1: Create a Detailed Shot List
A shot list is a production document that maps directly to how the images will be used. Photos for next year's event website need different framing than images for a sponsor thank-you email — and those differences should be captured in writing before you arrive.
Core categories for every conference shot list:
- Venue setup — empty room, stage, signage, branding before doors open
- Registration and arrival — attendees checking in, early networking
- Keynote speakers — multiple angles, expression close-ups, slides in frame
- Panel discussions — moderator and panelists together, audience interaction
- Audience reactions — note-taking, raised hands, engaged expressions
- Breakout and workshop sessions
- Sponsor and exhibitor areas
- Networking breaks — candid conversations, small groups
- Awards, announcements, or ceremony moments
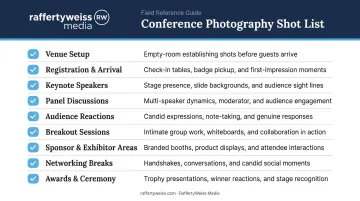
Share the shot list with your event team before the day. When the photographer, event coordinator, and client are working from the same document, critical moments don't get missed.
Tip 2: Scout the Venue in Advance
A walkthrough before event day eliminates guesswork on the shoot itself. What you're looking for:
- Stage lighting — backlit stages are one of the most common exposure challenges in conference photography; knowing this in advance lets you plan your camera position and settings
- Breakout room conditions — smaller sessions are often in dim, low-ceiling rooms that require different settings than the main hall
- Sightlines and access — where can you stand during keynotes without blocking attendees or appearing in the video crew's frame?
- Networking areas — locate where breaks will happen so you can be positioned there when the session ends
Check venue photography policies during the scout, not on the day. Some venues restrict tripods in aisles, prohibit flash entirely, or require press credentials for interchangeable-lens cameras.
Camera Settings and Gear for Conference Photography
Conference venues are among the hardest environments to photograph. Mixed artificial lighting, dim presentation rooms, fast-moving subjects, and no opportunity to add your own lighting during sessions all compound the challenge. The gear you bring and the settings you use matter more here than in most other corporate photography contexts.
Tip 3: Choose the Right Lenses for the Job
A two-lens kit handles nearly every conference scenario you'll encounter:
| Lens | Best For | Key Advantage |
|---|---|---|
| 24-70mm f/2.8 | Venue overviews, group shots, networking | Versatile range, wide aperture |
| 70-200mm f/2.8 or 85mm f/1.8 | Speaker coverage from distance | Reach without disrupting sessions |
The telephoto lens is particularly important. Shooting a speaker at 100-200mm from the back or side of the room means you're capturing natural, unposed expressions without the speaker noticing the camera. That's where the best expressions come from.
Image stabilization also earns its value in conference settings. Modern full-frame bodies compensate significantly: the Sony Alpha 7 IV offers 5.5 stops, while the Canon EOS R6 Mark II and Nikon Z6III both claim up to 8 stops. That extra latitude lets you shoot at slower shutter speeds without blur — and skip the tripod that obstructs sightlines.
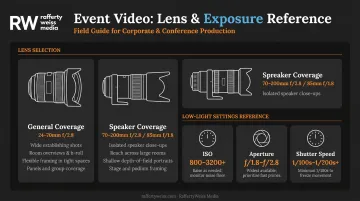
Tip 4: Master Low-Light Settings — And Know When to Skip the Flash
On-camera flash during presentations is almost always the wrong call. It distracts speakers mid-thought, flattens the natural stage lighting, and at many events it's explicitly prohibited.
Settings starting point for a typical conference presentation room:
- ISO: Start at 800–1600; raise to 3200 or higher if the room demands it
- Aperture: f/2.8 or wider — you need the light more than you need depth of field
- Shutter speed: At least 1/100s for a stationary speaker; increase toward your focal length's reciprocal (1/200s for a 200mm lens) to freeze gesture
Flash has one appropriate use: small group shots during networking breaks. A diffused or bounce flash adds fill light without the harsh, flat effect of direct on-camera flash. Keep a diffuser attached and bounce off ceilings where height allows.
Shooting Techniques: Getting the Best Shots on the Day
Preparation only takes you so far. On the day, the difference between a functional conference gallery and a genuinely useful one comes down to a few specific habits.
Tip 5: Vary Your Angles and Shot Scale
A gallery full of medium-range speaker shots from the same position reads as monotonous, regardless of image quality. Storytelling through sequenced shots — wide establishing frames, mid-range interaction shots, and tight close-up details — creates a visual narrative that conference organizers can actually use across multiple contexts.
In practice, this means deliberately moving:
- Crouch at the front of the stage for low-angle speaker shots that convey presence and energy
- Move to the back of the room for crowd and context shots that show attendance scale
- Get close during breaks for detail shots — a handshake, a business card exchange, a name badge and coffee cup in frame
Don't wait until you've covered every "required" shot to start varying your position. Build movement into your approach from the first session.
Tip 6: Photograph Speakers at the Right Moment
Most speakers use the same gestures repeatedly. They'll make the same emphatic hand motion, pause at the same rhetorical beat, return to the same posture. Watch for a few minutes before raising the camera.
The observe-then-shoot approach produces dramatically better results than continuous shooting. A few habits that help:
- Wait for the gesture or expression you've already seen once — it will repeat
- Shoot in short bursts at peak moments rather than holding the shutter down
- Cull aggressively: fewer final images means fewer mid-blink or open-mouth frames to sort through
Also account for who else is in the room. Video crews have fixed positions and sight lines, and photographers who drift into that frame create problems for both teams. In multi-camera conference productions, coordinating photographer and camera crew positions before the event starts — as RaffertyWeiss Media does during standard production prep — prevents conflicts and keeps both workflows clean.
Tip 7: Capture Candid Networking and Audience Moments
PCMA research shows that 89% of event participants say in-person events are irreplaceable — and the primary reason is networking and connection, not the stage content. Yet networking moments are consistently underrepresented in conference photo galleries.
That makes the gap worth closing. Candid networking shots are frequently the most-used images in post-event marketing — they show real connection, make the event feel approachable, and give prospective attendees a reason to register next year.
A few techniques that work:
- Use a longer focal length (85–135mm) to photograph conversations from across the room without interrupting them
- Stay mobile during breaks rather than positioning near the stage
- Avoid directing people mid-conversation — the moment you ask someone to "look natural," they won't
Must-Have Shots at Every Conference
A complete conference gallery — whether it's a 50-person workshop or a 5,000-attendee annual summit — covers these eight categories:
- Venue and setup — empty room, stage, branded signage, registration area before doors open
- Arrival and registration — attendees checking in, first conversations, name badges
- Keynote and speaker coverage — wide room shots, mid-range presenter frames, close-up expressions and gestures
- Audience engagement — reactions, note-taking, raised hands during Q&A
- Breakout and workshop sessions — smaller group dynamics look different from keynotes and add variety
- Sponsor and exhibitor areas — branded displays, booth conversations, sponsor visibility
- Networking breaks — candid conversations, small groups, informal moments
- Awards, announcements, or ceremony moments — anything on the agenda that carries emotional weight
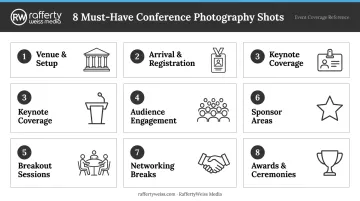
Cross-reference this checklist with your shot list before the event and track categories in real time. If you spot a gap early — say, no audience reaction shots by mid-morning — you still have time to circle back. Miss it at the end of the day, and that moment is gone.
Making Conference Photos Work After the Event
Photos only generate value when they're actually used — and organizations that plan their post-event content strategy before the event tend to get substantially more from the same images.
Primary downstream uses for conference photography:
- Post-event recap emails and newsletters
- LinkedIn posts highlighting speakers and sponsors (LinkedIn reports that posts with images generate a 2x higher comment rate than those without)
- Next year's event promotion — nothing sells registration like seeing a room full of engaged peers
- Annual reports and membership communications
- Sponsor thank-you materials and acknowledgments
- Website and landing page updates
Conference photography becomes far more powerful when paired with video. A highlight reel alongside a curated photo gallery creates a complete multimedia package that associations, corporations, and nonprofits can use across every channel.
Organizations planning both should coordinate photo and video coverage from the start — sharing the brief, aligning on key moments, and ensuring the two teams aren't competing for the same physical space. Teams like RaffertyWeiss Media handle this integration directly, deploying photographers and video crews under a single production plan rather than managing them as separate engagements.
Before the event, agree on delivery specs in the brief:
- Turnaround time and final handoff date
- Web-ready JPEGs for social media use
- High-resolution files for print and reports
- A curated selection — not a raw dump of every frame
A well-edited gallery of 150 strong images is far more useful than 900 unedited shots.
Frequently Asked Questions
What camera settings work best for photographing conference speakers?
Start with ISO 800–1600, aperture at f/2.8 or wider, and shutter speed around 1/100s or faster. With a telephoto lens, match shutter speed to your focal length (1/200s at 200mm) to prevent camera shake blur. Raise ISO to 3200 or higher in very dark rooms.
Should a conference photographer use flash during presentations?
Generally no. On-camera flash distracts speakers and audiences, flattens stage lighting, and is prohibited at many events. Available light with high ISO is the right approach during sessions. A diffused bounce flash is acceptable for small group shots during networking breaks.
How many photos should be delivered after a conference?
Quality beats quantity. A curated set of edited, publication-ready images serves clients far better than a large volume of unedited files. Exact numbers vary by event scope, so align on delivery expectations during the pre-event brief.
What is the best lens for conference photography?
A 24-70mm f/2.8 for general coverage and a 70-200mm f/2.8 (or 85mm f/1.8 prime) for speaker shots from a distance. Those two lenses together handle virtually every scenario you'll encounter at a conference.
How do you photograph conference attendees candidly without being intrusive?
Use a longer focal length (85mm or above) to capture natural moments from across the room, stay mobile throughout the venue during breaks, and avoid directing subjects during organic conversations. The moment people know they're being photographed, the candid quality disappears.
How does conference photography differ from event videography — and do you need both?
Photography captures individual moments for marketing materials, recaps, and print use. Video conveys atmosphere and narrative in a way stills can't. Planning both under a single production brief ensures they work together rather than as separate afterthoughts.